The bootfile is too small to support persistent snapshots

Good afternoon. It has been too long since I last posted. Today I found a solution to a problem I have seen several times and I wanted to share it.

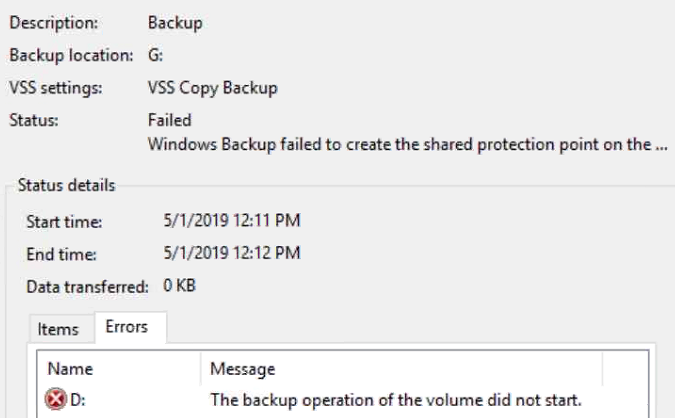
I had a customer that was experiencing backup issues with a new load of Windows. When trying to backup the server in Windows Serer Backup the backup would always fail with the error “Windows Backup failed to create the shared protection point on the …”. An important point to note is the error would always occur during the VSS snapshot phase of the backup.

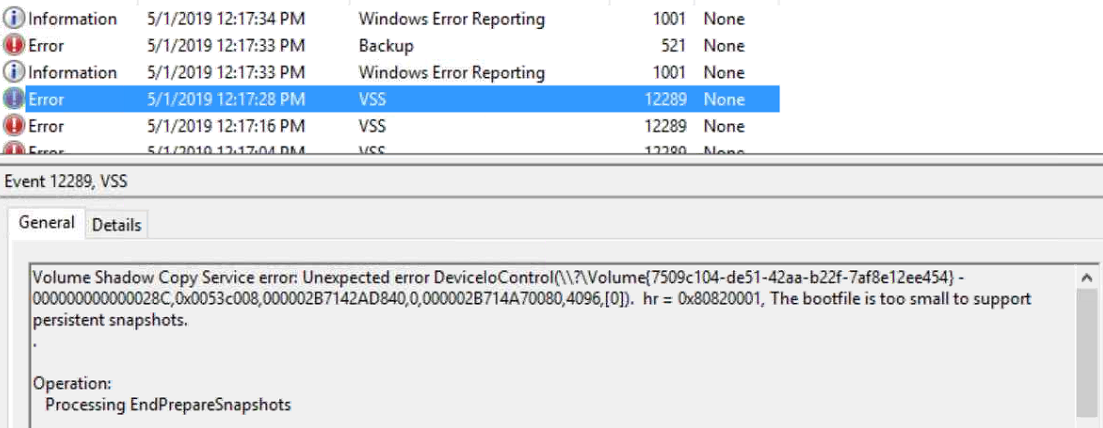
Below is the resulting Application event log with the key event highlighted.

At this point it is probably helpful to get a high level overview of how Windows Server Backup and VSS work. When Windows Server Backup starts a backup one of the first steps is to call VSS to take a snapshot. When the backup destination is local disk, the request is for both the backup destination and the backup source. This is so that Windows Server Backup can compare the blocks in both to perform an incremental backup. This means that a failure to snap the source or destination can cause the backup to fail.

I have seen this issue a handful of times and the consensus was the backup drive was causing the problem. While this can be the case, today I learned how to pinpoint which volume is actually causing this error with the event log. The key to determining this is the volume GUID ( Globally Unique Identifier) specified in the description of the event. This is the volume that cannot be snapped by VSS and is causing the backup to fail.

So how do you take the GUID and get the drive letter? This is the easiest part. Simply open an admin cmd window and run the command “mountvol”. At the end of the output all volumes with GUIDs and drive letters will be listed. In our case it was the D:\ drive that contained user data. We ran a test backup excluding the D:\ drive and it completed with no errors.

How do I fix the volume, so it will backup? Obviously we will not want to exclude a volume from the backup. There are two methods to repair this issue. First a chkdsk /f can be run to attempt and repair the volume. If that fails though, then you are likely looking at a bit of work to recreate the volume. Here is the process:

  1. Backup the data with robocopy or another file level backup utility. For robocopy an example command: robocopy <source> <destination> /MIR /XJ /W:5 /R:3 /LOG+:c:\robolog.txt
  2. Run diskpart and “clean” the disk. To do this run diskpart at an admin cmd, select the problem disk, then run the clean command.
  3. Recreate the volume
  4. Restore the data with robocopy or whatever file level backup utility used previously.

I hope you have found this post informative. If you have another way to solve this problem I would love to hear about it in the comments.

User profile corruption for Windows service accounts

Good morning. It has been a while since I posted, so I figured it was time for another article. I ran across an interesting issue this morning that I figured I would share. I had a customer that had recently experienced some file system corruption on the C: drive. Luckily chkdsk was able to correct the issue, but there was an issue that cropped up after running it. My customer was seeing an error in the Windows system log coming up frequently. The error was a 7005 with a source of Server Control Manager. The description was his concern though.
“The LoadUserProfile call failed with the following error:
The configuration registry database is corrupt.”

I did some research on this error and it is caused by a corrupt user profile. I figured it was probably a service user account as we had several services starting within seconds of each occurrence. Through a process of elimination I discovered that starting any service using the Network Service as the logon service caused the error.

So now I knew which account was causing the error, but how do you recreate the user profile for the Network Service user? I first checked the c:\users folder and the profile is not there. It is also not in the user profiles list in the system properties. I checked the registry as it has a list of all users with profile locations.
HKLM\SOFTWARE\Microsoft\Windows NT\CurrentVersion\ProfileList

Bingo!

The Network Service profile is located in C:\Windows\ServiceProfiles\NetworkService. I renamed the profile in the registry (S-1-5-20) to S-1-5-20.old and the NetworkService folder to NetworkService.old.

I then started a service that used the Network Service account, and success. The registry key was recreated, as was the folder, and we received no errors in the event log.

On a side note the above process will also work for the Local Service account. Just rename the appropriate registry key and folder.

I hope you found this article informative. If you have anything to add or would like to suggest an edit, please do so in the comments below.

Performing a bare metal restore with Windows

Good morning.  I had a question today on what to do if the hard drives are not detected when performing a bare metal restore.  Loading the driver is pretty straightforward, but I could not find a good guide on the whole process, so I figured it was time to put one together.  Below I will outline with screenshots the process to do a bare metal restore.  The screenshots will be from Windows Server 2016, but the process is the same for all currently supported versions of Windows.

  1. We start by booting to the Windows media.  After selecting the language, you have two options; Install now or Repair your computer.  Choose Repair your computer.
    2
  2. The next screen may give you more or fewer options.  Choose Troubleshoot.
    3
  3. From the Advanced options screen, choose System Image Recovery.
    4
  4. If given the option for a target operating system, choose the one applicable to you.
    5
  5. On the following screen, you will have two options; Use the latest image or select a system image.  If you want to restore the latest backup, then you simply need to click next.  If however you want to restore an earlier backup, choose the option to select a system image.  This guide will continue with the second option.
    7
  6. If you have only one backup drive, then only one line item will show.  A line for each backup drive will be displayed on this screen.  Choose the backup drive to restore from and click Next.
    9
  7. On this screen all the available backups are displayed to restore from.  Select the preferred backup to restore and click Next.
    10
  8. This screen provides three important options.  The first is to format and repartition the disks.  Select this option to completely wipe the drive being restored to.  It is possible to exclude data drives from this by clicking the exclude drives button and checking the drive to exclude.  The second option will only restore the system drives.  Keep in mind though, if the page file was moved a data drive, that drive is now considered a system drive and has to be part of the restore.  The last option is to install drivers.  Do this if the drives being restored to are not detected by the restore wizard.  Once all desired options are selected, click Next.
    12
  9. This screen is a summary of the restore.  Click Finish to start the restore process.
    14

After clicking yes on the prompt, the rest of the process is automated.  The server will be restored and automatically boot back into the restored Windows OS.

I hope you found this post informative.  If you have anything to add or suggest, please do so in the comments below.

TPM 2.0 and Windows 2012R2

Good morning.  It has been some time since I last posted.  I had an interesting case though I figured I would share.  I had a customer that was attempting to enable BitLocker on his C: drive.  When running the wizard it would immediately fail with the message “An internal error was detected.”

Bitlocker Internal error

I had to do a bit of research as that error is a little vague.  I was able to get the error code associated with this error when running manage-bde command.  With the error 0x80290107 I was able to find a forum post that indicated the root issue.  BitLocker in Windows Server 2012 R2 does not support the SHA256 encryption algorithm.  After changing the bios setting to SHA1, BitLocker worked without issue.

So if you have Windows Server 2012 R2 with TPM 2.0 and you get the above error enabling BitLocker on the C:, verify that the TPM is set to use SHA1 encryption.

I hope you found this post informative.  If you have anything to add or just want to comment, please do so below.

failed to initialize

I ran into an issue that took me quite a bit of time to resolve that I wanted to share with everyone.  I had a customer that I worked with that was not able to start any VM (virtual machine)  across 3 Hyper-V servers he had deployed in his environment.  When attempting to start the virtual machine it would get to starting…4% and then give a pop-up error message “<VM Name> failed to initialize”.  My first stop was the Hyper-V VMMS log which contained the same error.  I eventually checked the application log and found this event:

Event ID 1000, Application Crash
Faulting application name: vmwp.exe, version: 6.3.9600.18895, time stamp: 0x5a4b1c19
Faulting module name: KERNELBASE.dll, version: 6.3.9600.18895, time stamp: 0x5a4b1cf7
Exception code: 0xe06d7363

Faulting application path: C:\Windows\System32\vmwp.exe
Faulting module path: C:\Windows\system32\KERNELBASE.dll

This led me to a topic referring to an issue with January 2018 windows updates.  You can find that article here.  I uninstalled all updates in January and February on the first server, but this made no difference.  The solution was to change 2 registry keys:

HKEY_LOCAL_MACHINE\SYSTEM\CurrentControlSet\Control\Session Manager\Memory Management\FeatureSettingsOverride
HKLM\SOFTWARE\Microsoft\Windows NT\CurrentVersion\Virtualization\MinVmVersionForCpuBasedMitigations

Before running the below commands, the values were 3 and 1 respectively.

reg add “HKEY_LOCAL_MACHINE\SYSTEM\CurrentControlSet\Control\Session Manager\Memory Management” /v FeatureSettingsOverride /t REG_DWORD /d 0 /f
reg add “HKLM\SOFTWARE\Microsoft\Windows NT\CurrentVersion\Virtualization” /v MinVmVersionForCpuBasedMitigations /t REG_SZ /d “1.0” /f

I hope you have found this article informative.  If you have anything to add or just want to comment, please do so below.

Error 1202 from DFSR

I ran across an interesting issue I wanted to share.  I had a customer that recently had a migration performed.  Previously he was running SBS (Small Business Server) 2011 and is now running Windows Server Essentials 2016.  After demoting and removing the SBS 2011 server, he started receiving the following error on every boot.

1202 DFSR

The error is quickly followed by an informational message indicating that DFSR (Domain File System Replication) successfully connected to a domain controller.

Based on my previous experience with similar issues I posited that the problem was due to the DFSR service starting before either the network stack was fully initialized or before the DNS (Domain Name System) service was running.

I explained that based on the behavior this could safely be ignored.  This did not go over very well as the error also shows up in the Windows Essentials health report.  This brings us to the solution.  And this solution will work for just about any service that needs a little more time at boot.  We set the startup type for the DFSR service to Automatic (Delayed Start).  We restarted the server and this eliminated the 1202 error.

I hope that you found this article informative.  If you have anything to add, please feel free to leave a comment below.

The diskshadow command, a hidden gem

Good morning.  In case you haven’t guessed it already I typically write these posts in the morning.  As I write this now it is 6:30AM.  Today I wanted to share a command line utility I just recently discovered.  It has been part of Windows for quite some time though.  At least since Windows Server 2008.  The utility is called diskshadow.  This utility allows direct interaction with VSS (Volume Shadow Copy Service).  You can find the Microsoft technet article here.  In this article I will go over how I used it to troubleshoot a recent issue with VSS.

I was recently troubleshooting a VSS where the snapshot was failing on release.  As is typical, my customer was using a 3rd party backup software.  I wanted to test outside of the backup software, so we installed the Windows Server Backup feature and tried that.  Unfortunately the symptoms were identical.  After quite a bit of digging I ran across the diskshadow utility.  With that utility I received a different error which led me down the path of discovering the problem.  It turned out that the backup software’s filter driver was stepping on VSS and causing the failure.  After removing the backup software, VSS worked without issue.

So how is the diskshadow command used?  It can be used to create a snapshot, mount an existing snapshot, restore a snapshot and several other things.  Below I will cover the commands to take a VSS snapshot, as that is the functionality I find most useful.  To take a snapshot of the C: drive and test the majority of the VSS writers there are just 3 commands that need to be run.

  1. diskshadow (This starts the command and puts you at a diskshadow prompt.  This is similar to ntdsutil and nslookup.)
  2. add volume c: (This adds the C: drive to the snapshot.  You could substitute another drive letter if you want to test a specific writer.  The command can also be repeated with other drive letters to include them in the snapshot.)
  3. create (This starts the snapshot process with VSS.  It is important to note that the create command by itself will create a non-persistent snapshot.  That is the snapshot will be removed on exit from the diskshadow utility.  A persistent snapshot can be created with additional parameters.)

This utility is considerably faster when troubleshooting VSS, taking only about 1-2 minutes to take a snapshot or fail.  It also removes the requirement for a USB drive to temporarily store a backup.  For these reasons I will be using whenever troubleshooting VSS in the future.

I hope you found this article informative.  If you have anything to add or just want to leave a comment, please do so below.


The Network Location Awareness service

Good morning.  I wanted to share an issue I see on a regular basis.  This has to do with the NLA (Network Location Awareness) service.  For those that are not aware of this service it is responsible for determining the type and safety of the network(s) the computer is connected to.  There are 3 network classifications that are used.

  • Public – The NLA determines the computer is directly connected to the Internet or is on an unsafe network.  This is also the default profile assigned to a network adapter until one of the other profiles can be determined.
  • Private – The NLA determines the computer is isolated from the Internet by a NAT (Network Address Translation) device or router.
  • Domain – The NLA determines that the computer is connected to a domain.  It does this by attempting to contact a domain controller.  More specifically it performs a DNS (Domain Name System) query for a SRV (Service) record.  It will then make a connection to the domain controller.  If this is all successful, the domain profile is set.

So what is the purpose of the NLA and setting a network profile?  The primary purpose is for the Windows firewall.  Other applications and services can also access this data though.

Now that the NLA service is sufficiently explained, on to the common issue with it.  The NLA service by default is set to Automatic for its startup type.  Normally this works fine and the NLA properly detects the network.  There are some situations though where the service fails to set the profile correctly on startup.  I typically see this on domain controllers in a domain with just one domain controller.  This means that the network stack and DNS server service have to fully initialize and start before the NLA queries the network.  If they do not then the NLA is not able to contact a domain controller and assumes the computer is connected to a private or public network.

Regardless of the reason why the NLA is failing at startup the solution is fairly simple.  I have seen a 100% fix rate with simply setting the service startup type to Automatic (Delayed Start).  Doing this forces the NLA service to wait until all Automatic services have started, giving DNS enough time to start.  I have seen this little trick work with other services when they are having trouble at startup.

I hope you found this article informative.  If I missed anything or you just want to comment, please feel free to do so below.

An error has occurred 0x8007….

This article is for those that don’t know that 0x80070002 is “The system cannot find the file specified.” or that 0x80070020 is “The process cannot access the file because it is being used by another process”.  It seems impossible to memorize all the error codes in Windows and what they mean.  Thankfully there is no need to do this, as there is a utility built into Windows to decode them.

To find out what an error code means launch a command window and run this command slui 0x2a <error code>.  For instance slui 0x2a 0x80070002.  You will get a popup similar to the following:

slui 0x2a

You will need to Show details.  The description is the error code text.

I hope you found this article informative.  If you have anything to add please do so in the comments below.

Can you have too many CPU cores?

As I found out today the answer is yes, if you are deploying a Windows role that requires the WID (Windows Internal Database).  Below is the scenario I ran into and how to workaround the issue.

I had a customer that was attempting to deploy RDS (Remote Desktop Services).  I say attempting as he was having no luck getting connection broker to install properly.  The connection broker, session host, and rdweb roles would install, but the session collection was not being created.  Additionally, my customer was not able to manage RDS in server manager.  After several attempts of installing and removing the RDS components I noticed that the WID service was taking a very long time to start at boot and most times it would just hang.  I figured that we might have an issue with the existing OS or possibly a GPO (Group Policy Object) , so we isolated the server in an OU (Organizational Unit) with blocked inheritance and then added the newly loaded server to the domain.  The deployment still failed.  We then reloaded Windows.  Upon our first attempt at loading RDS it failed in exactly the same way.

At this point we knew the root of the issue was with the WID.  Searching the Internet turned up an article that alluded to a possible issue with configurations over 32 CPU cores.  My customer’s server is going to be used for a very CPU intensive application, so it was configured with 48 CPU cores (96 logical cores).  Since I was fresh out of ideas on what to try next I removed the WID and RDS components.  I then limited the server to 24 CPU cores through msconfig.  After a reboot we were able to deploy RDS without any problems.  To test, we removed the limit on CPU cores and rebooted.  The WID service then behaved exactly as before.

Now that we had the issue nailed down it was time to find a more permanent fix.  Before I get into that, let me detail the symptoms that were observed.  Hopefully this should help the next person that runs into this issue.

The primary behavior we observed was the WID service hung in a starting state.

Additionally we saw the following event in the application log when the WID finally started with more than 32 cores were exposed:

Process 0:0:0 (0xee8) Worker 0x0000000000 appears to be non-yielding on Schedule 47....

Finally the SQL error log contained a similar event:

*******************************************************************************
*
* BEGIN STACK DUMP:
* 07/21/17 09:35:26 spid 4268
*
* Non-yielding Scheduler
*
* *******************************************************************************
Stack Signature for the dump is 0x000000000000009C
External dump process return code 0x20000001.
External dump process returned no errors.

Process 0:0:0 (0x780) Worker 0x0000003077802160 appears to be non-yielding on Scheduler 47. Thread creation time: 13145128446017. Approx Thread CPU Used: kernel 62171 ms, user 7281 ms. Process Utilization 4%. System Idle 96%. Interval: 70052 ms.


So how did we fix this?

First we limited the number of CPUs exposed to Windows.  We then loaded SQL Management Studio as my customer was going to load SQL on the server.  We then connected to the WID (\\.\pipe\MICROSOFT##WID\tsql\query).  We set the CPU affinity to only use CPU 0 and CPU 1.  Finally we allowed Windows to see all the CPUs and rebooted.

Here are the steps I would recommend taking to correct this issue.

  1. If the WID and associated roles are loaded, remove them.  This may not be required depending on the role being installed, but it is better to be safe than sorry.
  2. Limit the CPUs exposed to Windows.  The easy way to do this is through msconfig.
    1. Launch msconfig.  Start, Run, msconfig
    2. Click on the Boot tab.
    3. Click Advanced options…
    4. Check the box for Number of processors:
    5. Set the server for 16 or less.
    6. Click OK twice and reboot.
  3. Install the Windows role that requires the WID as you normally would.
  4. Add the -P2 parameter to the WID service
    1. Open the services console (start, run, services.msc)
    2. Locate the Windows Internal Database service
    3. Right-click on the Windows Internal Database service and choose properties
    4. In the Start parameters box add “-P2” without quotes and click OK.  (This will limit the WID to 2 CPUs.  If you want more, change the number.)
  5. Remove the CPU limit imposed in step 2.


I would like to thank my colleague Curt for the startup parameter for the WID.  Far easier than loading SQL Management Studio Express.  I hope you found this article informative.  If you have anything to add or any suggestions, please do so in the comments below.