Performing a bare metal restore with Windows

Good morning.  I had a question today on what to do if the hard drives are not detected when performing a bare metal restore.  Loading the driver is pretty straightforward, but I could not find a good guide on the whole process, so I figured it was time to put one together.  Below I will outline with screenshots the process to do a bare metal restore.  The screenshots will be from Windows Server 2016, but the process is the same for all currently supported versions of Windows.

  1. We start by booting to the Windows media.  After selecting the language, you have two options; Install now or Repair your computer.  Choose Repair your computer.
    2
  2. The next screen may give you more or fewer options.  Choose Troubleshoot.
    3
  3. From the Advanced options screen, choose System Image Recovery.
    4
  4. If given the option for a target operating system, choose the one applicable to you.
    5
  5. On the following screen, you will have two options; Use the latest image or select a system image.  If you want to restore the latest backup, then you simply need to click next.  If however you want to restore an earlier backup, choose the option to select a system image.  This guide will continue with the second option.
    7
  6. If you have only one backup drive, then only one line item will show.  A line for each backup drive will be displayed on this screen.  Choose the backup drive to restore from and click Next.
    9
  7. On this screen all the available backups are displayed to restore from.  Select the preferred backup to restore and click Next.
    10
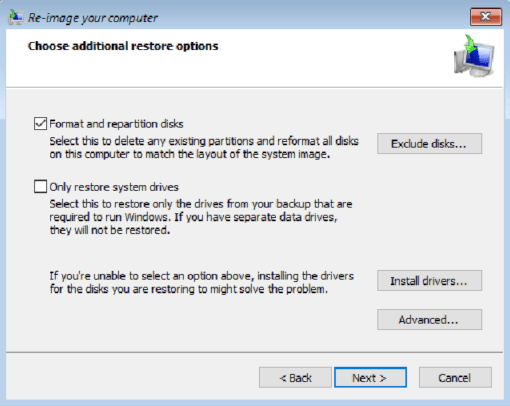
  8. This screen provides three important options.  The first is to format and repartition the disks.  Select this option to completely wipe the drive being restored to.  It is possible to exclude data drives from this by clicking the exclude drives button and checking the drive to exclude.  The second option will only restore the system drives.  Keep in mind though, if the page file was moved a data drive, that drive is now considered a system drive and has to be part of the restore.  The last option is to install drivers.  Do this if the drives being restored to are not detected by the restore wizard.  Once all desired options are selected, click Next.
    12
  9. This screen is a summary of the restore.  Click Finish to start the restore process.
    14

After clicking yes on the prompt, the rest of the process is automated.  The server will be restored and automatically boot back into the restored Windows OS.

I hope you found this post informative.  If you have anything to add or suggest, please do so in the comments below.

Advertisement

Error 1202 from DFSR

I ran across an interesting issue I wanted to share.  I had a customer that recently had a migration performed.  Previously he was running SBS (Small Business Server) 2011 and is now running Windows Server Essentials 2016.  After demoting and removing the SBS 2011 server, he started receiving the following error on every boot.

1202 DFSR

The error is quickly followed by an informational message indicating that DFSR (Domain File System Replication) successfully connected to a domain controller.

Based on my previous experience with similar issues I posited that the problem was due to the DFSR service starting before either the network stack was fully initialized or before the DNS (Domain Name System) service was running.

I explained that based on the behavior this could safely be ignored.  This did not go over very well as the error also shows up in the Windows Essentials health report.  This brings us to the solution.  And this solution will work for just about any service that needs a little more time at boot.  We set the startup type for the DFSR service to Automatic (Delayed Start).  We restarted the server and this eliminated the 1202 error.

I hope that you found this article informative.  If you have anything to add, please feel free to leave a comment below.

The diskshadow command, a hidden gem

Good morning.  In case you haven’t guessed it already I typically write these posts in the morning.  As I write this now it is 6:30AM.  Today I wanted to share a command line utility I just recently discovered.  It has been part of Windows for quite some time though.  At least since Windows Server 2008.  The utility is called diskshadow.  This utility allows direct interaction with VSS (Volume Shadow Copy Service).  You can find the Microsoft technet article here.  In this article I will go over how I used it to troubleshoot a recent issue with VSS.

I was recently troubleshooting a VSS where the snapshot was failing on release.  As is typical, my customer was using a 3rd party backup software.  I wanted to test outside of the backup software, so we installed the Windows Server Backup feature and tried that.  Unfortunately the symptoms were identical.  After quite a bit of digging I ran across the diskshadow utility.  With that utility I received a different error which led me down the path of discovering the problem.  It turned out that the backup software’s filter driver was stepping on VSS and causing the failure.  After removing the backup software, VSS worked without issue.

So how is the diskshadow command used?  It can be used to create a snapshot, mount an existing snapshot, restore a snapshot and several other things.  Below I will cover the commands to take a VSS snapshot, as that is the functionality I find most useful.  To take a snapshot of the C: drive and test the majority of the VSS writers there are just 3 commands that need to be run.

  1. diskshadow (This starts the command and puts you at a diskshadow prompt.  This is similar to ntdsutil and nslookup.)
  2. add volume c: (This adds the C: drive to the snapshot.  You could substitute another drive letter if you want to test a specific writer.  The command can also be repeated with other drive letters to include them in the snapshot.)
  3. create (This starts the snapshot process with VSS.  It is important to note that the create command by itself will create a non-persistent snapshot.  That is the snapshot will be removed on exit from the diskshadow utility.  A persistent snapshot can be created with additional parameters.)

This utility is considerably faster when troubleshooting VSS, taking only about 1-2 minutes to take a snapshot or fail.  It also removes the requirement for a USB drive to temporarily store a backup.  For these reasons I will be using whenever troubleshooting VSS in the future.

I hope you found this article informative.  If you have anything to add or just want to leave a comment, please do so below.


The Network Location Awareness service

Good morning.  I wanted to share an issue I see on a regular basis.  This has to do with the NLA (Network Location Awareness) service.  For those that are not aware of this service it is responsible for determining the type and safety of the network(s) the computer is connected to.  There are 3 network classifications that are used.

  • Public – The NLA determines the computer is directly connected to the Internet or is on an unsafe network.  This is also the default profile assigned to a network adapter until one of the other profiles can be determined.
  • Private – The NLA determines the computer is isolated from the Internet by a NAT (Network Address Translation) device or router.
  • Domain – The NLA determines that the computer is connected to a domain.  It does this by attempting to contact a domain controller.  More specifically it performs a DNS (Domain Name System) query for a SRV (Service) record.  It will then make a connection to the domain controller.  If this is all successful, the domain profile is set.

So what is the purpose of the NLA and setting a network profile?  The primary purpose is for the Windows firewall.  Other applications and services can also access this data though.

Now that the NLA service is sufficiently explained, on to the common issue with it.  The NLA service by default is set to Automatic for its startup type.  Normally this works fine and the NLA properly detects the network.  There are some situations though where the service fails to set the profile correctly on startup.  I typically see this on domain controllers in a domain with just one domain controller.  This means that the network stack and DNS server service have to fully initialize and start before the NLA queries the network.  If they do not then the NLA is not able to contact a domain controller and assumes the computer is connected to a private or public network.

Regardless of the reason why the NLA is failing at startup the solution is fairly simple.  I have seen a 100% fix rate with simply setting the service startup type to Automatic (Delayed Start).  Doing this forces the NLA service to wait until all Automatic services have started, giving DNS enough time to start.  I have seen this little trick work with other services when they are having trouble at startup.

I hope you found this article informative.  If I missed anything or you just want to comment, please feel free to do so below.

An error has occurred 0x8007….

This article is for those that don’t know that 0x80070002 is “The system cannot find the file specified.” or that 0x80070020 is “The process cannot access the file because it is being used by another process”.  It seems impossible to memorize all the error codes in Windows and what they mean.  Thankfully there is no need to do this, as there is a utility built into Windows to decode them.

To find out what an error code means launch a command window and run this command slui 0x2a <error code>.  For instance slui 0x2a 0x80070002.  You will get a popup similar to the following:

slui 0x2a

You will need to Show details.  The description is the error code text.

I hope you found this article informative.  If you have anything to add please do so in the comments below.

The case of the missing domain controller…

I wanted to talk about an issue today that I see with a great deal of regularity.  Statically setting an external or public DNS (Domain Name System) server in the DNS client settings of a machine that is joined to an Active Directory domain.

external-dns-server

In the above picture we have the Active Directory domain controller as the Preferred DNS server.  However we also have one of the Google public DNS servers as the Alternate DNS server.  At first look, it appears this might be a good idea.  If the Active Directory domain controller goes down, this PC can still resolve names on the Internet. However there is a significant disadvantage to setting up the DNS client in this way.  To understand this disadvantage, we must first understand how the DNS name resolution process works in Windows.

When a Windows system, either client or server, needs to resolve a name it goes through the following process.*

  1. The client checks to see if the name queried is its own.
  2. The client queries the DNS client resolver cache.  Any entries from the hosts file are preloaded to the resolver cache.
  3. Domain Name System (DNS) servers are queried.
  4. If the name is still not resolved, the NetBIOS name resolution sequence is used.

*I have omitted WINS from the process as it is rarely used anymore.

Let’s dive a little deeper into bullet point two.  There are two important takeaways for the DNS client cache.  The first is the time limit a record or lack thereof is cached.  This is typically referred to as TTL (Time To Live).  A positive answer is cached for its TTL or 24 hours whichever is less.  A negative response, that is when the record does not exist or cannot be found, is cached for 5 minutes.  The second takeaway is that clearing the cache can only be achieved by restating the DNS client service, running ipconfig /flushdns or restarting the client.

Now on to bullet point three and our example above.  The Windows DNS client will use the Preferred DNS server first.  If that server fails to respond, even just for a second, the Windows DNS client will switch over to the Alternate DNS server.  The Windows DNS client will not switch back to the Preferred DNS server unless the alternate fails to respond.  In the case of a public DNS server this is unlikely to happen.  If the Windows DNS client does get “stuck” on the alternate server there are three ways to get it to switch back; restart the DNS client service, restart the computer, or modify the DNS client configuration.

So now we have a better understanding of how DNS name resolution and the Windows DNS client work.  Let’s go over why public DNS servers should not be used.  In most environments there will be DNS timeouts on occasion.  As we now understand a DNS timeout can cause the DNS client to switch to the next DNS server in the list.  If the DNS client switches to a public DNS server then queries for internal resources, such as domain controller service records, or other systems on the LAN (Local Area Network), will fail.  So the bottom line here is that using an external DNS server in the DNS client settings can and usually will cause unpredictable behavior.

One final thought.  The default configuration of the Microsoft DNS server will allow Internet names to be resolved.  This is accomplished using root hints.  If a public DNS server must be used for Internet queries, then a DNS forwarder can be added in the DNS server configuration.

I hope you found this article informative.  If you have anything to add or see something that needs a correction, please leave a comment below.


Why are my computers not showing up on the Network in Windows explorer?

I ran across an interesting issue this morning.  I had a customer who was not able to browse for computers on most of his workstations and servers.  The problem seemed to start within the last two weeks.

I checked the workstation, DNS client, network list, and network location awareness services.  They were all running.  The problem turned out to be the Function Discovery Resource Publication service.  This service was not started and was set to manual.  Without this service the computer will not advertise itself and will not be able to discover other computers on the network.

So if no computers are showing in Network in Windows Explorer check the Function Discovery Resource Publication service and verify it is running.  I would also recommend setting it to Automatic start so that everything works correctly after a reboot.

I hope this article has been informative.  If you have anything to add, please use the comments section below.

Where are my file shares?

Good morning.  I ran into an issue I see from time to time in support.  One of my customers was unable to find where his shares were located on the filesystem.  The solution is quite easy to solve with a single command.

Net Share

Running that command will display all shares on the server including hidden and administrative shares along with their paths.  This command will work in any version of Windows and does not require elevation.

I hope you found this article informative.  If you have anything to add, please do so by adding a comment below.

Why is my network profile stuck on Public?

Good morning.  A quick tip for today on an issue I run into from time to time.  I have seen a lot of Windows machines in my time.  One of the problems that I run into on a fairly regular basis is network communication issues.  A possible cause for these issues can be due to the Windows firewall being too restrictive.  That is what we are going to discuss today in this post.

Before we get into how to fix the network profile, let’s first discuss why the network profile even matters.  To do that we need to talk about the Windows firewall a little.  The Windows firewall provides a barrier between the Windows operating system and the network(s) to which it is attached.  It has 2 or 3 distinct profiles that it will operate in.  Whether it has 2 or 3 depends on if the system is joined to an Active Directory domain.  Each These 3 profiles are as follows:

  • Public – Windows assumes it is directly connected to the Internet or is on an unsafe or unfamiliar network.  This profile is the most restrictive and blocks most incoming traffic.
  • Private – Windows assumes this network is isolated from the Internet and is considered mostly safe.  This profile allows more traffic than the public profile, but some services are still blocked by default.
  • Domain – Windows assumes the network is trusted.  This profile is the least restrictive and by default allows most known services through.

As you probably already guessed the profile used by the Windows firewall correlates directly with the network profile assigned to the network adapter.  So if your network profile shows Public you can bet that almost all services will not work.

Now that we know about the profiles and what they do, how can we change the network profile.  If this were a client operating system like Windows 8/8.1/10 then it would be easy, just go into Network and Sharing Center and change the profile.  On a server operating system, for instance Windows Server 2012/2012R2/2016, the option to change the profile is not there.  That is, unless you count the side pop-out asking if you want to discover computers on the network.  Clicking yes on that pop-out will put the network profile into private.  Clicking no will put it into public.

If you clicked no, there is still hope.  There is a PowerShell command that can be used to set the network profile; Set-NetConnectionProfile.  Here is the command I use to quickly change the mode of all network cards in a system.

Get-NetConnectionProfile | Set-NetConnectionProfile -NetworkCategory Private

This will set all network cards to Private profile.

If you need to set just one network card, you will need to know the interface index.  To find this run the following command.

Get-NetConnectionProfile | FT Name,InterfaceAlias,InterfaceIndex -a

This will give a table of all the network adapters in the server with their names and indexes.  You can then run the following command to set a single network adapter

Set-NetConnectionProfile -InterfaceIndex <index number> -NetworkCategory Private

I hope you found this article helpful.  If you have anything to add or just want to leave a comment, please do so below.


Group Policy and the case of the missing permission.

Good morning.  I had a case yesterday that yielded several interesting article ideas.  This is probably the most interesting one, and I have seen this very issue on at least three occasions.  The issue started on a domain rename.  If you have ever done a domain rename, you know there are quite a few steps.  After doing some checks and making some corrections we were able to complete the domain rename.  My customer then advised that his Folder Redirection policy was not applying on any workstations.  So in this article I am going to cover how to troubleshoot a group policy not applying and the specific fix for the situation I ran into yesterday.

The first step when troubleshooting just about any group policy issue is to pull a group policy report from a client that should be getting the policy.  My preferred method is to go to a command prompt and run the following commands:

gpresult /h report.htm
report.htm

This will run the report and save it to a file called report.htm.  The second line then opens that report in a web browser.

When troubleshooting an issue where a policy is not applying I like to focus on the denied sections.  In our case folder redirection is a user policy, so I checked there.  Below is similar to what I found.
gpo-inaccessible

There were two clues as to what the issue was here.  The first clue is that the policy name is not being displayed.  Instead we just see the GUID (Globally Unique Identifier).  The second clue is the reason denied.  We can see it was denied because the policy is inaccessible, empty or disabled.

The next step was to check to see if the policy was accessible in the SYSVOL share.  In our case we had no problem accessing the files.  We then checked in the group policy management console.  We verified the policy was not empty or disabled.  So it would appear that we have eliminated all possible issues.  However there is another set of permissions.

delegation-tab

This was the set of permissions that were not correct in our case.  The Authenticated Users group was missing.  I have seen this issue on several occasions when one of my customers is trying to “lock down” the server.  Even if you add in another group, for instance Domain Users, and the user and/or computer is a member of that group, the GPO (Group Policy Object) will still fail to apply.  The fix is quite simple.  Add back the Authenticated Users group and give it read permissions.  After adding back Authenticated Users and running a gpupdate /force on the client the policy applied without issue.

I hope you have found this informative.  If you have anything to add or just want to comment, please do so below.