How to upgrade Windows Server Essentials to Standard edition

Time for another quick tip.  In case you hadn’t guessed already, I really like Essentials.  You get quite a few features for a much better price than Standard edition.  There are some limitations though with Essentials.  The good news is that the server can later be upgraded to Standard and the process only takes a few minutes.  On the flip side, a standard license has to be purchased.

Let’s walk through the upgrade process.

  1. Purchase a Windows Server Standard license
  2. Open an administrative PowerShell command
  3. Run the following command to verify the target edition:
    dism /online /Get-TargetEditions
    You should see Target Edition : ServerStandard or something similar
  4. Run the following command to complete the upgrade:
    dism /online /Set-Edition:ServerStandard /ProductKey:XXXXX-XXXXX-XXXXX-XXXXX-XXXXX /AcceptEula
    Change the edition and product key to match the ones you have.

You should see output similar to below.  Reboot when prompted.  (I have updated this picture.  It is 2019 Essentials.)

2019 Essentials upgrade to Standard

I hope you found this informative.  If you have any comments or suggestions, please leave them below.

Advertisement

Windows Server 2016 Essentials and Remote Desktop Services, the untold story

Good morning.  Time for another installment.  Today I wanted to talk about 2 of my favorite Microsoft technologies in one article; RDS (Remote Desktop Services) and the Essentials experience.

Recently I have seen a rise in the deployment of RDS, specifically Session Host, on Windows Server 2016 Essentials.  While this seems like the perfect money saving combination, Essentials is about $200-300 cheaper than the Standard SKU, it is not.  While not well documented, this configuration is not supported by Microsoft*.  This may not deter some admins.  However, it also will not work properly.  While I have seen this issue on several occasions in customer environments, I figured I would reproduce this.  Below is the documentation of that process.

I started by installing Windows Server 2016 Essentials into a generation 2 VM (Virtual Machine).  I ran the initial configuration wizard to complete setup.  I verified that only 2 simultaneous interactive logon sessions would work.  See the screen capture below.

too-many-users

I then shutdown the server and took a checkpoint.  After booting the VM back up, I installed RDS via the installation wizard.  The roles installed properly, but I received an error when creating the session collection.  After a reboot the session collection did show up.  This seemed odd to me, but upon checking Server Manager all seemed to be normal.  I then tested the number of simultaneous connections again.  I ran into the same 2 user limit.

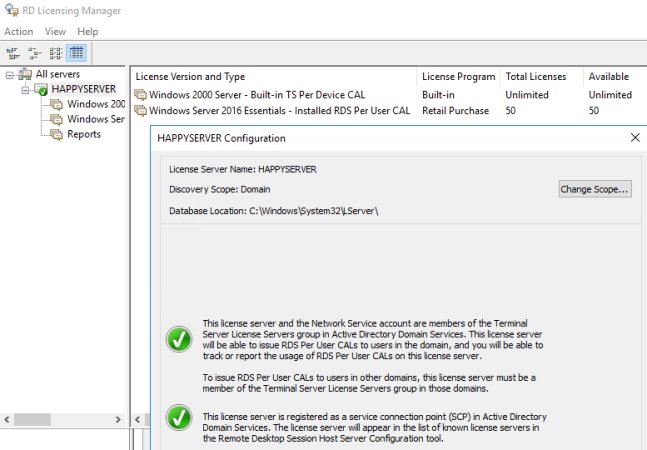
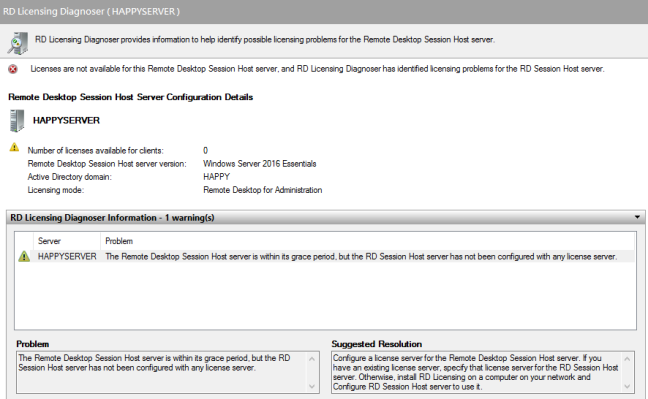
Maybe this is due to RDS licensing not being installed or configured?  I then installed and activated a license server on the same machine.  I added a 50 pack of user CALs.  Finally, I added the license server and the network service account to the Terminal Server License Servers group in AD.  After a restart, RD Licensing manager is reporting all green checks.  However RD Licensing Diagnoser is reporting it is not configured with a license server.  See the screenshots below.  This led me to check the deployment properties and I found it was configured for Per User mode with the correct server.

rd-licensing-happy

rd-licensing-diagnoser

At this point it is pretty clear this is not going to work properly, but I wanted to dig a little deeper and find out why.  Time to break out the PowerShell.  I ran the following commands to manually configure Session Host via PowerShell:
$obj = gwmi -namespace “Root/CIMV2/TerminalServices” Win32_TerminalServiceSetting$obj.ChangeMode(4)

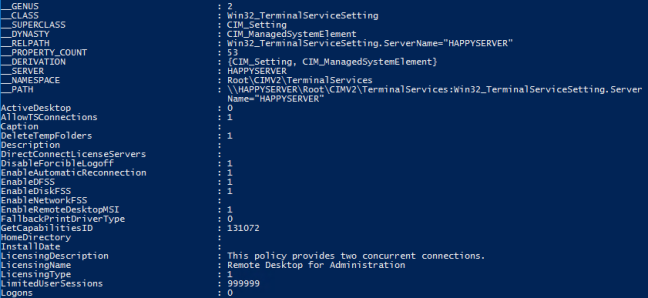
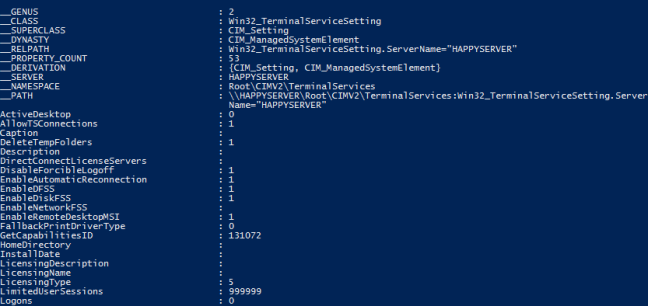
Upon running the last command I receive an error indicating the method is not specified, meaning the parameter doesn’t exist.  This led me to output all parameters from the Win32_TerminalServiceSetting object.  This is how I discovered the root cause for the limitation.  It appears that even though I have install Session Host, the server is still in Remote Desktop for Administration mode.  In this mode it is not possible to specify a license server or licensing mode.  Also there is the limitation of two simultaneous interactive logon sessions.

powershell-output

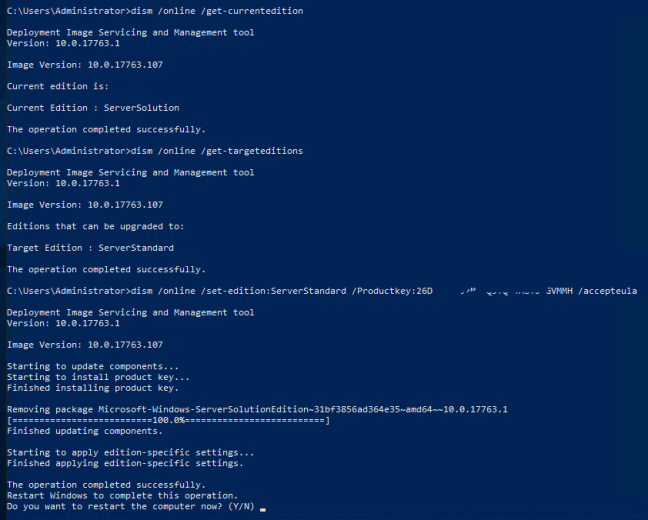
So is it possible to get around this or correct it?  The good news is that the process is fairly easy.  The bad news is that an upgrade to standard edition is required.  A walk-through of the upgrade process can be found here.  I went through this process in my test environment.  After reactivating my license server and updating the licensing mode in the deployment properties, my RD Licensing Diagnoser reported no issues.  Also for curiosity sake, below is a screenshot of the same PowerShell output after upgrading to Standard.

powershell-output-after-upgrading

So the moral of the story is if you need RDS in Windows Server 2016 you will need Standard edition or higher.  I hope this has been informative for you.  If you have any comments or suggestions, please leave them below.


*There is only one reference, that I could find, to the supportability of RDS on the Essentials SKU.  It is in the Windows Server 2012 R2 Licensing Datasheet.  On page 5, look for footnote 8.

How to properly deploy Remote Desktop Services in a workgroup

I have previously written an article on setting up RDS (Remote Desktop Services) in domain environment.  However, what if there is only one server and/or there is no domain?  It is still possible to setup RDS, but the process is a little different.  Connection broker, a component of RDS, does not work properly in a workgroup environment.  Also it is not possible to use Remote App, another component of RDS, or create a session collection.  Without a session collection, Session Host, yet another RDS component, will not be able to obtain licenses. Without licenses RDS will cease to function after the initial grace period.  Typically this is 120 days. We get around this by manually editing the WMI attributes for Session Host.

Here is how to properly deploy RDS in a workgroup.  I am going to use PowerShell to make this quick and easy.  This guide is applicable for Windows 2012, 2012R2 and 2016 in a single server workgroup environment.  If you have Windows Server 2019 or higher the process has changed.  Skip to the bottom for that process.

  1. Launch a Windows PowerShell using the Run as Administrator option.
  2. Run the following command to install the RDS components that are required. (This will automatically restart the server)
    Install-WindowsFeature RDS-RD-Server,RDS-Licensing -IncludeManagementTools -Restart
  3. After the server restarts, log back in.
  4.  Launch a Windows PowerShell using the Run as Administrator option.
  5. Run the following commands to manually configure Session Host*.
    • $obj = gwmi -namespace “Root/CIMV2/TerminalServices” Win32_TerminalServiceSetting
    • $obj.ChangeMode(2)
    • $obj.SetSpecifiedLicenseServerList($env:computername)

The next step is to activate the RDS license server and install RDS CALs.  You can find an article on how to do that here.

* On the $obj.ChangeMode() command:
$obj.ChangeMode(4) = Per User licensing
$obj.ChangeMode(2) = Per Device licensing (supported mode for workgroups)

An update to this article.  It appears in Windows Server 2016 and 2019 Microsoft is enforcing Per Device mode in a workgroup configuration.  So if you install RDS in a workgroup in 2016 or 2019, you should use Per Device mode.  This is not usually an issue as RDS CALs can be converted between Per User and Per Device in the licensing manager.

Another update, July 2021.   Microsoft has changed the process for Windows Server 2019.  The above PowerShell script will fail to set the mode.  To properly do this the registry needs to be edited.

  1. Open Registry editor (Right-click Windows logo at the bottom left and choose Run.  Type regedit and hit enter.)
  2. Navigate to:
    HKEY_LOCAL_MACHINE\SYSTEM\CurrentControlSet\Control\Terminal Server\RCM\Licensing Core
  3. Verify there is a DWORD for “LicensingMode” and it is set to 2.  If not present, right-click and choose New-> DWORD (32-bit) Value.  This must be set to 2 for “Per Device”
  4. Navigate to:
    HKEY_LOCAL_MACHINE\SYSTEM\CurrentControlSet\Services\TermService\Parameters\LicenseServers
  5. Verify there is a Multi-String for “SpecifiedLicenseServers” and it is set to the server’s name.  If not preset, right-click and choose New->Multi-String Value.  
  6. Reboot the server.