The Network Location Awareness service

Good morning.  I wanted to share an issue I see on a regular basis.  This has to do with the NLA (Network Location Awareness) service.  For those that are not aware of this service it is responsible for determining the type and safety of the network(s) the computer is connected to.  There are 3 network classifications that are used.

  • Public – The NLA determines the computer is directly connected to the Internet or is on an unsafe network.  This is also the default profile assigned to a network adapter until one of the other profiles can be determined.
  • Private – The NLA determines the computer is isolated from the Internet by a NAT (Network Address Translation) device or router.
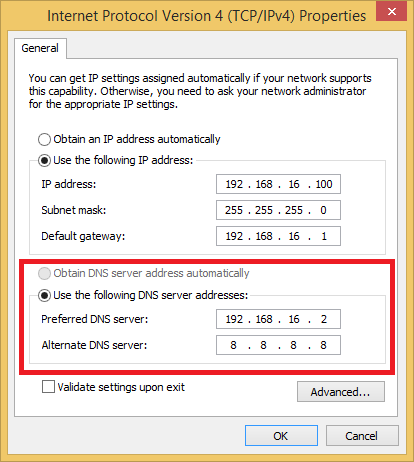
  • Domain – The NLA determines that the computer is connected to a domain.  It does this by attempting to contact a domain controller.  More specifically it performs a DNS (Domain Name System) query for a SRV (Service) record.  It will then make a connection to the domain controller.  If this is all successful, the domain profile is set.

So what is the purpose of the NLA and setting a network profile?  The primary purpose is for the Windows firewall.  Other applications and services can also access this data though.

Now that the NLA service is sufficiently explained, on to the common issue with it.  The NLA service by default is set to Automatic for its startup type.  Normally this works fine and the NLA properly detects the network.  There are some situations though where the service fails to set the profile correctly on startup.  I typically see this on domain controllers in a domain with just one domain controller.  This means that the network stack and DNS server service have to fully initialize and start before the NLA queries the network.  If they do not then the NLA is not able to contact a domain controller and assumes the computer is connected to a private or public network.

Regardless of the reason why the NLA is failing at startup the solution is fairly simple.  I have seen a 100% fix rate with simply setting the service startup type to Automatic (Delayed Start).  Doing this forces the NLA service to wait until all Automatic services have started, giving DNS enough time to start.  I have seen this little trick work with other services when they are having trouble at startup.

I hope you found this article informative.  If I missed anything or you just want to comment, please feel free to do so below.

Advertisement

How to re-deploy VPN in 2016 Essentials in legacy mode.

This is the third article in a series of articles covering VPN in Windows Essentials.  In the first article I covered an issue with VPN and DHCP.  In the second article I covered how to re-deploy VPN with PowerShell in 2016 Essentials.  In this article I will cover how to re-deploy VPN in legacy mode.

  1. First we must clear the configuration. Launch a PowerShell session as administrator.
  2. Run Uninstall-RemoteAccess.  Hit enter when prompted.
  3. Install the RRAS (Routing and Remote Access Service) console by running the following command: Install-WindowsFeature RSAT-RemoteAccess-Mgmt
  4. Run rrasmgmt.msc to launch the RRAS console.
  5. Right-click on the server name and choose “Configure and Enable Routing and Remote Access”
    RRAS 1
  6. Click Next.
  7. Ensure the Custom configuration radio button is selected and click Next.
    RRAS 2
  8. Check the box for VPN and click Next.
    RRAS 3
  9. Click Finish to complete the initial configuration.  You will get a popup indicating a policy was created.  Click OK to continue.
    RRAS 4
  10. When prompted to start the service, click Start service.
  11. RRAS is now running, but there are two more required steps to complete the configuration.  Right-click the server name and choose Properties.
    RRAS 5
  12. Click on the Security tab.  At the bottom of the screen, choose the correct certificate and click Apply.  Click Yes to restart RRAS.
    RRAS certificate
  13. Click the IPv4 tab.  Click the radio button for Static address pool and click the Add button.  Fill in the start IP address and end IP address and click OK twice.
    RRAS static pool
  14. Restart the RRAS service.

At this point RRAS should be configured properly.  Optionally you can disable the unused protocols in RRAS.  To do so right-click on Ports and click Properties.
RRAS ports

Only SSTP is used in Essentials by default, so the other protocols can be removed/minimized.  Highlight IKEv2 and click Configure.  Change the maximum ports to 0 (zero) and click OK.  Click Yes on the popup.  Repeat this with L2TP and GRE.  For PPTP you cannot reduce to zero, but you can reduce to 1 (one).  I also like to reduce the number of ports to match the number of IP addresses in the static pool.  This is to ensure that all connections get a valid IP address.  So I limited the ports to 20 for SSTP.  When complete it should look something like below.
RRAS ports limited

I hope you found this article informative.  If you have anything to add or just want to comment, please do so below.

How to re-deploy VPN in 2016 Essentials with PowerShell

In my previous article I discussed an issue I see commonly with VPN in Essentials.  In that article I gave the fix for all versions of Essentials except 2016.  In this article I will cover the fix for 2016 Essentials.

As stated previously, 2016 Essentials uses PowerShell to configure the VPN.  Here is what the default configuration looks like:

RemoteAccess Default

If you try to manage it in the RRAS (Routing and Remote Access Server) console, you will see this:

legacy mode

The message would imply that you could turn on legacy mode.   This is true, but to turn on legacy mode requires clearing the configuration from RRAS.  Clearing the configuration must be done with PowerShell.  Re-deploying the VPN can be done with both PowerShell and the RRAS console.  Below are the PowerShell commands.

  1. Launch a PowerShell session as administrator.
  2. Run Uninstall-RemoteAccess.  Hit enter when prompted
  3. Run Install-RemoteAccess -VpnType Vpn -IPAddressRange 192.168.16.100,192.168.16.120
    Change the ip addresses to match the range you want to use.  In the command above the start IP address is 192.168.16.100 and the end IP is 192.168.16.120.
  4. It may be necessary to modify the SSL certificate.  To check this run Get-RemoteAccess.  If the SSL certificate matches the one installed by the Essentials anywhere wizard, then you are done.  If not, please proceed to the next step.
  5. Run Set-Location Cert:\LocalMachine\My; Get-ChildItem | Subject,Thumbprint
    You should see output similar to the following:
    certificate 1
  6. Make note of the Thumbprint for the certificate that was created in the anywhere access wizard.
  7. Next assign the certificate to the VPN with the following command:
    Get-ChildItem | ? Thumbprint -eq “C39ED8D5ADC2F73A05A909BE9C4692B43B963FB2” | Set-RemoteAccess
  8. Finally verify the correct certificate is assigned to the VPN with the command:
    Get-RemoteAccess
    RemoteAccess fixed

Clients should be able to connect and access resources via the VPN now.

I hope you found this article informative.  If you have any suggestions or comments please leave them below.

An error has occurred 0x8007….

This article is for those that don’t know that 0x80070002 is “The system cannot find the file specified.” or that 0x80070020 is “The process cannot access the file because it is being used by another process”.  It seems impossible to memorize all the error codes in Windows and what they mean.  Thankfully there is no need to do this, as there is a utility built into Windows to decode them.

To find out what an error code means launch a command window and run this command slui 0x2a <error code>.  For instance slui 0x2a 0x80070002.  You will get a popup similar to the following:

slui 0x2a

You will need to Show details.  The description is the error code text.

I hope you found this article informative.  If you have anything to add please do so in the comments below.

The case of the missing domain controller…

I wanted to talk about an issue today that I see with a great deal of regularity.  Statically setting an external or public DNS (Domain Name System) server in the DNS client settings of a machine that is joined to an Active Directory domain.

external-dns-server

In the above picture we have the Active Directory domain controller as the Preferred DNS server.  However we also have one of the Google public DNS servers as the Alternate DNS server.  At first look, it appears this might be a good idea.  If the Active Directory domain controller goes down, this PC can still resolve names on the Internet. However there is a significant disadvantage to setting up the DNS client in this way.  To understand this disadvantage, we must first understand how the DNS name resolution process works in Windows.

When a Windows system, either client or server, needs to resolve a name it goes through the following process.*

  1. The client checks to see if the name queried is its own.
  2. The client queries the DNS client resolver cache.  Any entries from the hosts file are preloaded to the resolver cache.
  3. Domain Name System (DNS) servers are queried.
  4. If the name is still not resolved, the NetBIOS name resolution sequence is used.

*I have omitted WINS from the process as it is rarely used anymore.

Let’s dive a little deeper into bullet point two.  There are two important takeaways for the DNS client cache.  The first is the time limit a record or lack thereof is cached.  This is typically referred to as TTL (Time To Live).  A positive answer is cached for its TTL or 24 hours whichever is less.  A negative response, that is when the record does not exist or cannot be found, is cached for 5 minutes.  The second takeaway is that clearing the cache can only be achieved by restating the DNS client service, running ipconfig /flushdns or restarting the client.

Now on to bullet point three and our example above.  The Windows DNS client will use the Preferred DNS server first.  If that server fails to respond, even just for a second, the Windows DNS client will switch over to the Alternate DNS server.  The Windows DNS client will not switch back to the Preferred DNS server unless the alternate fails to respond.  In the case of a public DNS server this is unlikely to happen.  If the Windows DNS client does get “stuck” on the alternate server there are three ways to get it to switch back; restart the DNS client service, restart the computer, or modify the DNS client configuration.

So now we have a better understanding of how DNS name resolution and the Windows DNS client work.  Let’s go over why public DNS servers should not be used.  In most environments there will be DNS timeouts on occasion.  As we now understand a DNS timeout can cause the DNS client to switch to the next DNS server in the list.  If the DNS client switches to a public DNS server then queries for internal resources, such as domain controller service records, or other systems on the LAN (Local Area Network), will fail.  So the bottom line here is that using an external DNS server in the DNS client settings can and usually will cause unpredictable behavior.

One final thought.  The default configuration of the Microsoft DNS server will allow Internet names to be resolved.  This is accomplished using root hints.  If a public DNS server must be used for Internet queries, then a DNS forwarder can be added in the DNS server configuration.

I hope you found this article informative.  If you have anything to add or see something that needs a correction, please leave a comment below.


Why are my computers not showing up on the Network in Windows explorer?

I ran across an interesting issue this morning.  I had a customer who was not able to browse for computers on most of his workstations and servers.  The problem seemed to start within the last two weeks.

I checked the workstation, DNS client, network list, and network location awareness services.  They were all running.  The problem turned out to be the Function Discovery Resource Publication service.  This service was not started and was set to manual.  Without this service the computer will not advertise itself and will not be able to discover other computers on the network.

So if no computers are showing in Network in Windows Explorer check the Function Discovery Resource Publication service and verify it is running.  I would also recommend setting it to Automatic start so that everything works correctly after a reboot.

I hope this article has been informative.  If you have anything to add, please use the comments section below.

Where are my file shares?

Good morning.  I ran into an issue I see from time to time in support.  One of my customers was unable to find where his shares were located on the filesystem.  The solution is quite easy to solve with a single command.

Net Share

Running that command will display all shares on the server including hidden and administrative shares along with their paths.  This command will work in any version of Windows and does not require elevation.

I hope you found this article informative.  If you have anything to add, please do so by adding a comment below.

Why is my network profile stuck on Public?

Good morning.  A quick tip for today on an issue I run into from time to time.  I have seen a lot of Windows machines in my time.  One of the problems that I run into on a fairly regular basis is network communication issues.  A possible cause for these issues can be due to the Windows firewall being too restrictive.  That is what we are going to discuss today in this post.

Before we get into how to fix the network profile, let’s first discuss why the network profile even matters.  To do that we need to talk about the Windows firewall a little.  The Windows firewall provides a barrier between the Windows operating system and the network(s) to which it is attached.  It has 2 or 3 distinct profiles that it will operate in.  Whether it has 2 or 3 depends on if the system is joined to an Active Directory domain.  Each These 3 profiles are as follows:

  • Public – Windows assumes it is directly connected to the Internet or is on an unsafe or unfamiliar network.  This profile is the most restrictive and blocks most incoming traffic.
  • Private – Windows assumes this network is isolated from the Internet and is considered mostly safe.  This profile allows more traffic than the public profile, but some services are still blocked by default.
  • Domain – Windows assumes the network is trusted.  This profile is the least restrictive and by default allows most known services through.

As you probably already guessed the profile used by the Windows firewall correlates directly with the network profile assigned to the network adapter.  So if your network profile shows Public you can bet that almost all services will not work.

Now that we know about the profiles and what they do, how can we change the network profile.  If this were a client operating system like Windows 8/8.1/10 then it would be easy, just go into Network and Sharing Center and change the profile.  On a server operating system, for instance Windows Server 2012/2012R2/2016, the option to change the profile is not there.  That is, unless you count the side pop-out asking if you want to discover computers on the network.  Clicking yes on that pop-out will put the network profile into private.  Clicking no will put it into public.

If you clicked no, there is still hope.  There is a PowerShell command that can be used to set the network profile; Set-NetConnectionProfile.  Here is the command I use to quickly change the mode of all network cards in a system.

Get-NetConnectionProfile | Set-NetConnectionProfile -NetworkCategory Private

This will set all network cards to Private profile.

If you need to set just one network card, you will need to know the interface index.  To find this run the following command.

Get-NetConnectionProfile | FT Name,InterfaceAlias,InterfaceIndex -a

This will give a table of all the network adapters in the server with their names and indexes.  You can then run the following command to set a single network adapter

Set-NetConnectionProfile -InterfaceIndex <index number> -NetworkCategory Private

I hope you found this article helpful.  If you have anything to add or just want to leave a comment, please do so below.


Group Policy and the case of the missing permission.

Good morning.  I had a case yesterday that yielded several interesting article ideas.  This is probably the most interesting one, and I have seen this very issue on at least three occasions.  The issue started on a domain rename.  If you have ever done a domain rename, you know there are quite a few steps.  After doing some checks and making some corrections we were able to complete the domain rename.  My customer then advised that his Folder Redirection policy was not applying on any workstations.  So in this article I am going to cover how to troubleshoot a group policy not applying and the specific fix for the situation I ran into yesterday.

The first step when troubleshooting just about any group policy issue is to pull a group policy report from a client that should be getting the policy.  My preferred method is to go to a command prompt and run the following commands:

gpresult /h report.htm
report.htm

This will run the report and save it to a file called report.htm.  The second line then opens that report in a web browser.

When troubleshooting an issue where a policy is not applying I like to focus on the denied sections.  In our case folder redirection is a user policy, so I checked there.  Below is similar to what I found.
gpo-inaccessible

There were two clues as to what the issue was here.  The first clue is that the policy name is not being displayed.  Instead we just see the GUID (Globally Unique Identifier).  The second clue is the reason denied.  We can see it was denied because the policy is inaccessible, empty or disabled.

The next step was to check to see if the policy was accessible in the SYSVOL share.  In our case we had no problem accessing the files.  We then checked in the group policy management console.  We verified the policy was not empty or disabled.  So it would appear that we have eliminated all possible issues.  However there is another set of permissions.

delegation-tab

This was the set of permissions that were not correct in our case.  The Authenticated Users group was missing.  I have seen this issue on several occasions when one of my customers is trying to “lock down” the server.  Even if you add in another group, for instance Domain Users, and the user and/or computer is a member of that group, the GPO (Group Policy Object) will still fail to apply.  The fix is quite simple.  Add back the Authenticated Users group and give it read permissions.  After adding back Authenticated Users and running a gpupdate /force on the client the policy applied without issue.

I hope you have found this informative.  If you have anything to add or just want to comment, please do so below.

SMB 1 in Windows 10

Today we have a quick tip from Luis, one of my partners in crime.  He had a customer that was experiencing poor file sharing performance with Windows 10 clients.  After replicating the environment Luis discovered the issue was due to the SMB (Server Message Block) version being used.  He was able to increase the performance by forcing a lower version of SMB to be used.  He discovered though that SMB version 1 is no longer supported by default in Windows 10.  He found a way to turn it back on.

I wanted to share that with you as it can be useful in a situation where there is an older file server.  When I say older, think Windows 2003 or Windows XP.  So it is no wonder than Microsoft has decided not to allow SMB 1 by default.  I don’t recommend following this procedure simply to increase performance as the trade-off is less security and fewer features.  Also following the below process will not by itself increase speed, as the highest version of SMB will be negotiated*.  This process will allow a Windows Server 2016 or Windows 10 client to connect to an older Windows system hosting a file share.

To enable SMB 1 do the following on the Windows Server 2016 or Windows 10 client.

  1. Open the registry editor and navigate to the following key:
    HKLM\SYSTEM\CurrentControlSet\Services\LanmanWorkstation
  2. Open the DependOnService key.
    default
  3. Add MRxSmb10 to the list below MRSmb20 entry and click OK.
    new
  4. Close the registry editor and restart the Workstation service.


I hope you enjoyed this article and found it informative.  If you have anything to add or just want to comment, please feel to do so below.


*If you are dead-set on running SMB 1 to improve performance have a look at this Microsoft article.