The DNS management console fails to update or gets “stuck”

Another quick tip here.  I recently had a DNS (Domain Name System) console that was failing to update.  I knew that DNS was functioning properly and that all the records were there.  They were just not showing up on this particular server.  This is actually a pretty easy fix.

To reset the DNS console, or most mmc consoles, you just need to delete the settings file.  There is a settings file for each user that has logged in.  This file is located at C:\Users\<username>\AppData\Roaming\Microsoft\MMC\dnsmgmt.  You may notice other files in this directory.  Those files are the settings files for their respective mmc consoles.

Remove a Remote Desktop Server from a deployment.

Good afternoon all.  I figured I would take a few minutes for a quick RDS (Remote Desktop Services) tip.  There are some instances where it may be necessary to remove a role from a RDS server or remove a whole server.  You might think this is as easy as just removing the installed role(s).  There is one additional step though if you want the server to be removed from the list of Deployment Servers.

rds-remove-server

To remove a role from a server do the following:
1. Launch a PowerShell window as administrator
2. Run: Remove-RDServer -Server “RDS.mydomain.com” -Role “RDS-Licensing”
3. Run: Remove-WindowsFeature RDS-Licensing

The above example will remove the RDS licensing role from the deployment and the role from the server.  The command can be changed to remove other role services.  You can run Get-Help Remove-RDServer for full details or go here.

Using PowerShell to create a self signed certificate for longer than 1 year

Good morning.  It has been quite some time since I last posted.  I ran across this little gem this morning and figured I would share.

So you want to use a self-signed certificate for (RDS) Remote Desktop Services or maybe a custom website, but you want the certificate to be valid for longer than a year.  You can now use PowerShell to create a certificate for as long as you like.  Before we get into how to do this, let me emphasize this is not recommended by Microsoft.  It is much preferred to use a 3rd party trusted certificate.  Also the below command will only work in Windows Server 2016/Windows 10 and higher.

To create a self-signed certificate for a web server that is valid for 5 years:
New-SelfSignedCertificate -Subject “RDS.Contoso.local” -DnsName “RDS.Contoso.com”, “www.contoso.com” -CertStoreLocation “cert:\LocalMachine\My” -KeyAlgorithm RSA -KeyLength 2048 -KeyExportPolicy Exportable -NotAfter (Get-Date).AddYears(5)

Unable to extend an NTFS volume

Good afternoon.  I ran into an interesting issue this afternoon I wanted to share.  I had a customer that was receiving the following error:

“The volume cannot be extended because the number of clusters will exceed the maximum number of clusters supported by the filesystem.”

Unable to extend, cluster size

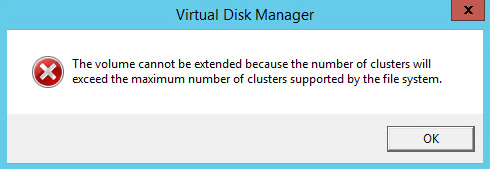
He encountered the error when trying to extend a volume.  The volume was 20TB (Terabytes) and he was trying to add another 19TB for a total of 39TB.  After some research I found, based on his setup, that the maximum volume size was 32.75TB.  We extended the volume to that size and we were done.

I figured someone might find it useful if I l go over the process of determining the maximum size for a volume.  There are a couple pieces of key information that are required.  The first is the maximum number of clusters in a NTFS volume.  This is 2^32 -1 clusters, or roughly 4 billion.  The second piece of information we need is the bytes per cluster.  To get this information, run the following command: fsutil fsinfo ntfsinfo x:
Replace the x: with the actual drive letter.  Below is output from the command.  In this example we see that we are using 4096 bytes per cluster or 4K for short.

bytes per cluster

Now that we have both pieces of information we just need to do some simple math to find the maximum volume size.  Multiply the maximum maximum number of clusters by the cluster size.  Taking the example above, that would be 4,294,967,295 * 4096 = 17,592,186,040,320 bytes.  To convert this to megabytes, divide the number by 1,048,576 (1024*1024).  In this example we get 16,777,215 Megabytes.

To make this even easier, here is a handy table:

Cluster size NTFS Max Size
512 bytes 2,199,023,255,040 (2TB)
1024 bytes 4,398,046,510,080 (4TB)
2048 bytes 8,796,093,020,160 (8TB)
4096 bytes 17,592,186,040,320 (16TB)
8192 bytes 35,184,372,080,640 (32TB)
16384 bytes 70,368,744,161,280 (64TB)
32768 bytes 140,737,488,322,560 (128TB)
65536 bytes 281,474,976,654,120 (256TB)

I hope you enjoyed this article.  If you have any suggestions or comments please leave them below.

Catch a misbehaving driver with verifier

Today I wanted to mix it up a little.  I want to talk a little about debugging, more specifically about using driver verifier.  If you have seen a Windows bug check, aka the blue screen of death, then you have probably seen a DRIVER_IRQL_NOT_LESS_OR_EQUAL.  This particular bug check has two codes associated with it; 0x0000000A and 0x000000D1.  In the majority of cases, this bug check is caused by a 3rd party driver that is misbehaving.  Most of the time the cause can be identified by debugging the kernel memory dump.  Sometimes however the problematic driver is paged out and is no longer present in the memory dump.  In this case we can use driver verifier to catch this misbehaving driver and force a bug check to happen before the driver is paged out.  The rest of this article will discuss how to enable driver verifier for this scenario.

  1. Click Start, or in Windows 2012 and higher right-click Start, and choose Run.  Type in verifier and click OK.
  2. From the select a task options, select “Create custom settings (for code developers)” and click Next.
    select a task
  3. From the select individual settings from this full list, tick the check box for Special pool and click Next.
    special pool
  4. From the select what drivers to verify options, select “Select driver names from a list” and click Next.
    select drivers to verify
  5. Sort the driver list by provider.  Tick the check box for all drivers that are not provided by Microsoft, and click Finish.  We do this so that we can monitor all 3rd party drivers.
    driver list
  6. Reboot the server.

After the server is rebooted all 3rd party drivers will be monitored.  If one of them should misbehave, driver verifier will force the system to bug check.  It should then be fairly simple to find the problem driver in the memory dump.

If you have any suggestions for this article, please leave a comment below.

Exchange mail flow: Identifying the issue

This will be the first in a short series of articles I will be writing on mail flow troubleshooting.  I wanted to start with a general article on how to narrow the scope of the mail flow issue.  Mail flow issues typically fall into one of three categories.

  1. External mail is not coming in for all or some email.
  2. Internal mail is not going out to the Internet for all or some email.
  3. Internal mail flow is not working.

So before we start troubleshooting we need to determine which category to focus on.  Occasionally you may see an issue that encompasses more than one of the categories above.  If that is the case then it is best to start on internal mail flow.

When I start looking at a mail flow issue I like to start with a few questions.

  • Are you having any issues sending or receiving emails to other users in your organization?
    If the answer is yes, then this narrows down the scope of the issue tremendously.  If the answer is no, then we know we need to start on internal mail flow troubleshooting.
  • Are you having a problem with receiving emails from users outside your organization?
    If the answer is yes, then you can focus on troubleshooting mail coming in from the Internet.  If the answer is no, then the issue is likely mail going out to Internet is having issues.
  • Are you having problems with users outside your organization receiving the emails your users are sending?
    If the answer is yes, then you can focus on mail going out to other mail servers on the Internet.

So now that we have an understanding of how to narrow the scope of the issue, the next parts of this series will focus on troubleshooting each of the different categories.

Unable to connect in Outlook after installing Exchange 2016

Outlook

This is one of those errors that is a real pain because there are so many issues that can cause it.  In this article I wanted to touch on a fairly new issue that causes this issue; MAPI over HTTP.

If you have not heard of MAPI over HTTP, it is the replacement for RPC over HTTP as the default connection method for Exchange 2016.  It is also available in 2013 SP1 and later, but not turned on by default.  So if you are installing the first Exchange server in an organization and it is Exchange 2016, then MAPI over HTTP is enabled as the default protocol.  If the MAPI URL is not configured then Outlook 2013+ clients will see the error above when trying to setup the mailbox.

The fix is pretty easy though.  The MAPI virtual directory must be configured to match the certificate name.  The below command should do the trick.  Just make sure and change the name to the correct one for your environment.

Get-MapiVirtualDirectory | Set-MapiVirtualDirectory -InternalUrl https://hostname.domainname.com/mapi -ExternalUrl https://hostname.domainname.com/mapi

So there you have it.  Hopefully this did the trick for you.  If you have any questions or suggestions, please leave a comment below.

License compliance checking in Windows Essentials and Foundation

Good morning.  I figured it was time for another post on Essentials.  Some parts of this article also apply to Foundation edition.

Let’s start off with a little background on Essentials edition.  Windows Server Essentials edition is designed for a small to medium sized business.  It is a very good option for a small to medium sized business with less than 25 users/computers.  Here are a few of the advantages to running Essentials.

  • It is less expense than standard edition.  Typically by $200-300.
  • There are no additional CALs (Client Access Licenses) to purchase.  Twenty five user CALs are included.
  • Can be easily upgraded to standard edition with a single command.
  • Client PC Backup is builtin.  This feature automatically backs up client PCs to the server
  • Anywhere access is available.  This is a feature that was first introduced in SBS (Small Business Server)  It allows a user to remotely access computers and file shares.  It also allows the administrator to access the Dashboard from anywhere.  Additionally the administrator can setup a SSTP (Secure Socket Tunneling Protocol) VPN (Virtual Private Network) via a wizard.
  • Easy integration with Microsoft cloud solutions.


What’s the catch?  There is always a catch.  Windows Essentials edition is no exception.  Below are the limitations imposed by running Essentials.

  • The Essentials server MUST be a domain controller.
  • The Essentials server must hold all the FSMO (Flexible Single Master Operation) roles.  If you want to learn more about the FSMO roles here is a good article.
  • Only one domain is permitted in the forest where the Windows Essentials edition server resides.
  • No forest/domain trusts are permitted.
  • The Remote Desktop Session Host role feature is not supported and typically will not function.

So what if the server is not a domain controller or violates one of the rules above?  This is where the Server Infrastructure License Service comes into play.  This service regularly checks the server to verify it is not violating the EULA (End User License Agreement).  If a violation is found the server will shutdown every 27.67 days (27 days, 16 hours).  Why Microsoft chose 27.67 days, I have no idea.  Before it shuts down though it will warn you.  The events will show up in the Server Infrastructure Licensing log.
Server Infrastructure Licensing Error

The next question is how do we fix these errors.  I have seen three causes for this issue.  Let’s go over each one and how to fix it.  After you believe you have fixed the issue, see the the next section for a way to confirm the issue is resolved.

  1. The first cause of this issue is also the most painful to fix.  If the server is demoted, and put into a workgroup it will cause this issue.  All checks will fail because the domain can no longer be contacted.  Unfortunately the only fix is to reinstall Windows on the server.
  2. The second reason these errors might crop up is due to the check failing due to an issue with Active Directory.  For instance, if the server is not advertising as a domain controller due a SYSVOL issue.  If an Active Directory issue is suspected, the first place to start should be to run a dcdiag.  Dcdiag will test the basic functionality and report any issues found.  As stated above, if there are SYSVOL issues, then the server will likely fail the advertising test.
  3. The last reason I have seen on more than a few occasions is the following error:

    Log Name:      Microsoft-Windows-Server Infrastructure Licensing/Operational
    Event ID:      2
    Level:         Error

    Description:The Forest Trust Check in the Licensing component did not pass because error 0x80070008 occurred in function fe1 [YJBI].
    Not enough storage is available to process this command.

    This error seems to indicate that we are low on hard drive space.  However this is not the case.  This error is actually referring to a special pool in memory (RAM, Random Access Memory) called the heap.  The heap is a finite size, regardless of how much RAM is in the system.  Normally Windows will not experience a heap exhaustion, that is where this special pool of memory is completely depleted.  However, if a program or driver is leaking memory, then the pool will eventually run out.  In case you are wondering what a memory leak is, it occurs when a program or driver allocates memory, but does not free it when complete.
    So in essence this error is caused by a malfunctioning program or driver.  The good news is that every time I have seen this issue in Essentials or Foundation it was caused by a printer driver.  There are 2 ways to fix this problem.  The first way is to simply restart the printer spooler service.  Restarting the printer spooler service unloads the printer drivers and frees all memory associated with them.  This will temporarily eliminate the issue.  A scheduled task could then be created to automatically do this on a regular basis.  The optimal solution though is to find the problem driver and either remove or update it.

So to this point we have covered some of the pros and cons of running Essentials, what happens when the EULA is violated, and some common causes for the Server Infrastructure Licensing service shutting down the server.  The last item I wanted to cover is how to force a new compliance check from the Server Infrastructure Licensing service.  This process works for both Essentials and Foundation edition.  This is useful if you are seeing compliance check errors, have taken measures to correct them, and now want to test if the issue is resolved.  It is surprisingly easy to force a compliance check.  Only one PowerShell command is required.  Ensure you run PowerShell as administrator when running this command.

Stop-Process -ProcessName silsvc -Force

The above command forces the Server Infrastructure License service process to stop.  The process will then immediately start again.  The trick here is that the Server Infrastructure License does a compliance check every time it starts.  You should see a compliance check within 2-3 minutes after the service stops.
Well, we covered a lot of ground with this post.  If you have any questions, or any suggestions please add a comment below.

Fixing RDS when it has been improperly deployed

In the last few articles I walked you through setting up RDS (Remote Desktop Services) in a domain, or a workgroup, and installing and activating CALs.  Today I wanted to touch on how to fix RDS when it has been improperly deployed.  The good news, it is typically very easy.

Typically when RDS is deployed improperly the user has installed the Session Host manually via the add roles wizard.  While this is fine in a workgroup, it does not work properly in a domain environment.  If this is the case, just running the Remote Desktop Services installation wizard is typically enough to fix the deployment.  Just follow this guide.  I have had about 90% success rate with this.

But what if the Remote Desktop Services installation wizard fails or does not complete? Don’t fret.  More than likely the issue can still be resolved without removing the roles.  Below are the two most common issues that I have run into when fixing an RDS deployment.

  1. The Remote Desktop Services installation wizard fails to create the Session Collection and remote apps.  Usually when this happens it is because the user has attempted to fix the installation with Group Policy.  There are two legacy group policy settings  for specifying the license server and license mode.  These settings  are not supported in 2012, do not work, and will cause the Session Collection wizard to fail.  The fix is simple, remove the group polices.  Set them to Not configured.  Here is a screen shot of what the policies should look like and their location.RDS GPO
    Computer Configuration -> Administrative Templates -> Windows Components -> Remote Desktop Services -> Remote Desktop Session Host -> Licensing
  2. The Connection Broker role service role fails to deploy and the Remote Desktop Services installation wizard indicates the server requires a restart.  Rebooting the server and running the wizard will again indicate a reboot is required.
    The first time I ran into the this issue it took me a bit of time to track it down.  After rebooting the server and checking for the file C:\windows\winsxs\pending.xml, and not finding it.  Additionally, checking the c:\windows\log\cbs\cbs.log and seeing that a reboot is not pending, I was confused.  I then dug deeper into the cbs log and found that the installation was being rolled back and that roll back required a restart.  So why was the install failing?  The key is an error logged in the system log during the install.

    Log Name:      System Source:
    Service Control Manager
    Event ID:      7041
    Level:         Error
    Description: The MSSQL$MICROSOFT##WID service was unable to log on as NT SERVICE\MSSQL$MICROSOFT##WID with the currently configured password due to the following error:  Logon failure: the user has not been granted the requested logon type at this computer.

    Service: MSSQL$MICROSOFT##WID  Domain and account: NT SERVICE\MSSQL$MICROSOFT##WID

    This service account does not have the required user right “Log on as a service.

    The Connection Broker service requires a SQL database to store its data.  By default it uses the WID (Windows Internal Database).  Because the WID cannot start, the Connection Broker role service install fails and the install has to be rolled back.  This typically only occurs when the RDS server is also a domain controller.  It is possible though on a member server if security has been tightened.  The fix is fairly easy and is documented in Microsoft KB 2832204.   Because this typically occurs on a domain controller though, you cannot simply edit the local group policy or the local security policy.  You must create a new GPO (Group Policy Object) and link it to the domain controllers container.  Here is the process.

    1. On a domain controller, launch the group policy management console.  (gpmc.msc)
    2. Expand Forest, Domains, your domain name, then Domain Controllers.
    3. Right-click on the Domain Controllers container and choose Create a GPO in this domain and Link it here.
    4. Give the GPO a descriptive name like “Allow WID logon on DC” and click OK.
    5. Right click the new GPO and choose Edit.
    6. Navigate to the following location: Computer Configuration -> Policies -> Windows Settings -> Security Settings -> Local Policies -> User Rights Assignment
      WID GPO
    7. Right-click on Log on as a service and choose Properties.
    8. Check the box to Define these policy settings.
    9. Click on Add User or Group and add the following user: NT SERVICE\ALL SERVICES
    10. Click OK and close the Group Policy Management Editor window.
    11. To make the setting take effect immediately, run gpupdate /force at an administrative command prompt.

If the above solutions did not resolve the deployment issues with RDS, there is another option.  If all else fails, remove all RDS role features* and start the deployment over again.  As bad as this sounds it typically only takes 30-60 minutes to remove the roles and redeploy correctly.

If I missed anything, please submit a comment below.  Thanks for reading.

* If Licensing has been configured and RDS CALs (Client Access Licenses) added, it is typically best to not remove the licensing role feature.  That is unless you enjoy calling the Microsoft clearinghouse. 🙂

How to activate a license server and install CALs

This is the 3rd article in a series of articles on RDS (Remote Desktop Services)  In this installment I will cover how to activate a license server and installing RDS CALs (Client Access Licenses)

To activate the license server:

  1. Open the RD Licensing Manager.  (Right-click Stat button, Run, licmgr.exe)
  2. Expand All servers.
  3. Right-click the server name and choose Activate Server.
    Activate Server1
  4. Click Next on the Welcome screen.
  5. Click Next on the Connection Method screen.
  6. Enter the company information.  This should match the information given when the RDS CALs were purchased.  Click Next when complete.
  7. This screen is optional.  You can enter the information if you choose.  Click Next when complete.
  8. The Completing the Activate Server Wizard screen should come up and indicate the server was activated successfully.  If the CALs are available to install, Click Next.  Otherwise uncheck the “Start Install Licenses Wizard now” option and click Finish.


To Install RDS CALs:

  1. Open the RD Licensing Manager.  (Right-click Stat button, Run, licmgr.exe)
  2. Expand All servers.
  3. Right-click the server name and choose Install Licenses.  See the picture above.
  4. Click Next on the Welcome screen.
  5. Choose the licensing program that is applicable.  The two most common programs are retail, using a product key, and Open License.  With the Open License program you should receive an email from the re-seller with the authorization and license number.  Click Next.
  6. Enter the license information and click Next.
  7. If prompted, enter the type and quantity of CALs.
  8. Click Finish to complete the install.


To verify that the above process worked correctly:

  1. Launch Server Manager.
  2. From the top right, choose Tools, Terminal Services, RD Licensing Diagnoser.

If all worked there should be no errors and the licensing mode and number of CALs should match what was installed.